Tag Archives: pmp

6 Project Risk Tools to Ensure Project Management Success

Click the video above to view

Effective Risk Management Tools for Successful Project Outcomes

In the world of project management, risk is an inevitable factor that can significantly impact project success. Effective risk management is crucial in navigating these uncertainties. In this article, we explore six powerful tools and techniques that every project manager should consider when addressing risk. These tools will help identify, assess, mitigate, and monitor risks throughout the lifecycle of a project. Let’s dive into each of these risk management strategies.

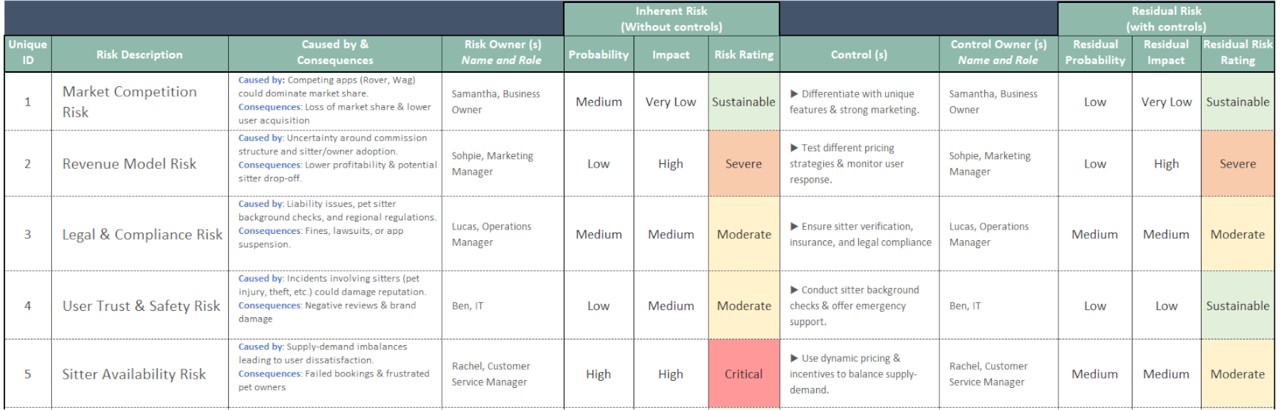
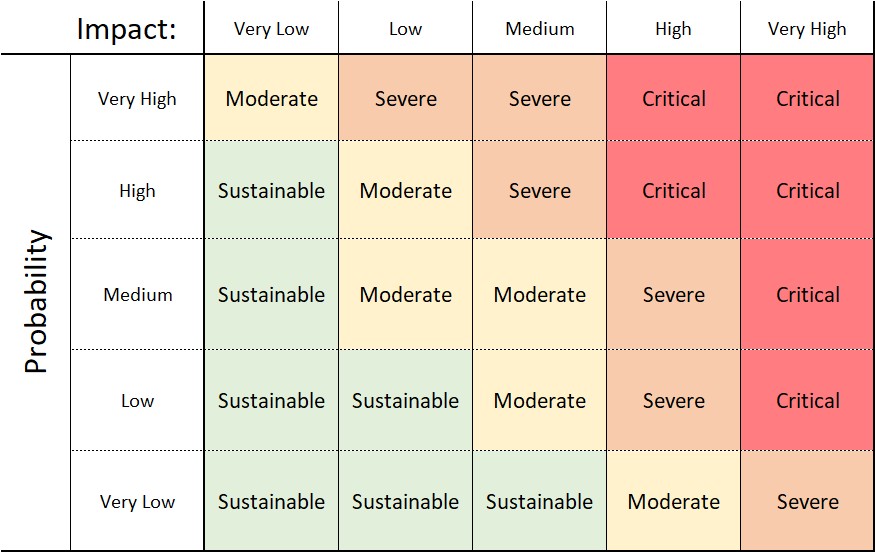
1. Risk Assessment Matrix

The Risk Assessment Matrix is an essential tool for identifying and evaluating risks based on their probability and impact. It helps project teams to prioritize risks and decide on appropriate actions for risk mitigation. By rating risks from low to high, teams can calculate a risk score by multiplying the likelihood of a risk occurring with its potential impact. This process highlights critical risks that require immediate attention and control measures, allowing teams to focus their efforts where it matters most. Once mitigation actions are applied, the risk levels can be re-assessed and brought under control, reducing their potential impact on the project.
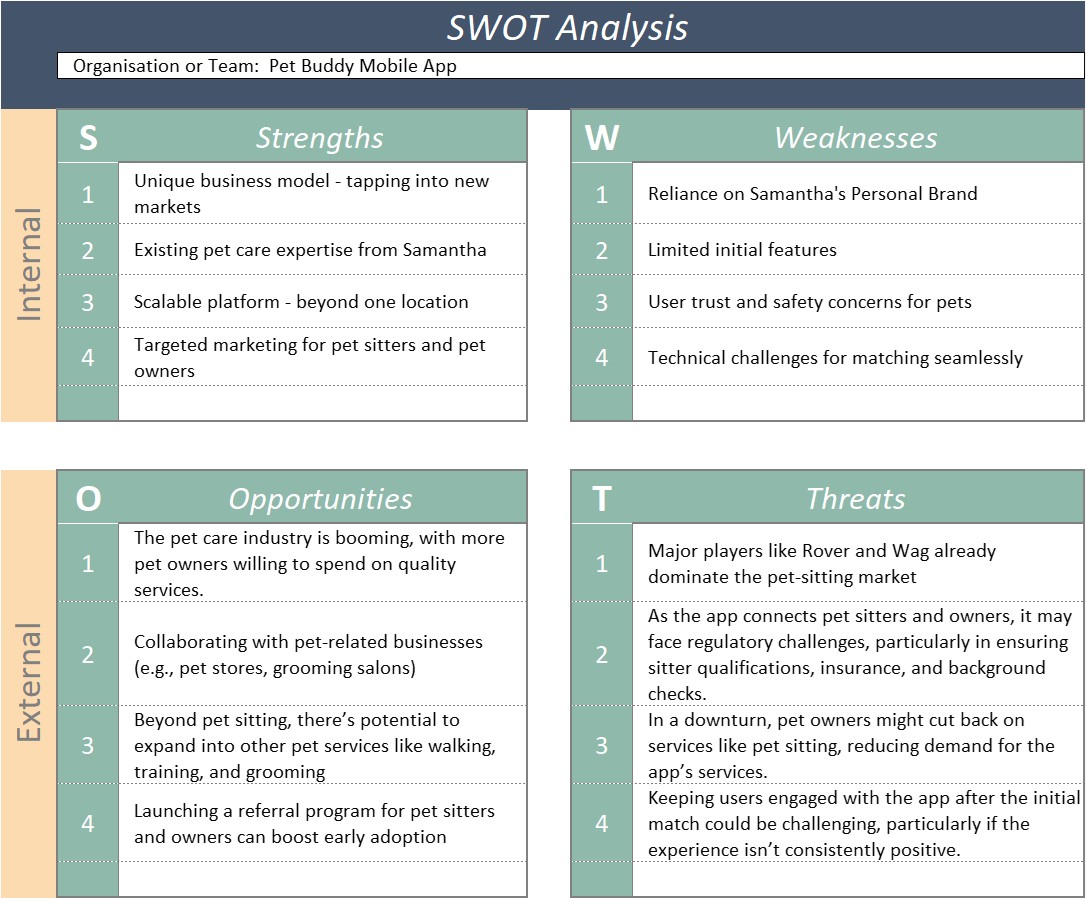
2. SWOT Analysis

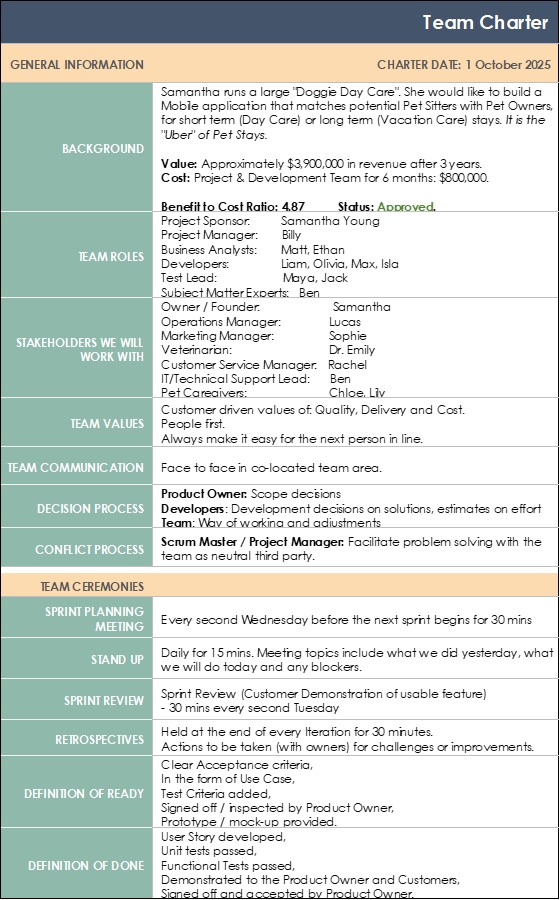
A SWOT analysis (Strengths, Weaknesses, Opportunities, and Threats) is an excellent brainstorming tool for identifying risks. In the context of risk management, weaknesses represent internal risks within the project, and threats refer to external factors that could pose risks. For example, if a project depends heavily on the business owner’s brand, this could be considered a weakness. External threats could include competitor dominance in the market or economic downturns affecting consumer spending. The SWOT analysis helps teams analyze internal and external factors that could affect the project’s success and create proactive strategies to manage those risks.
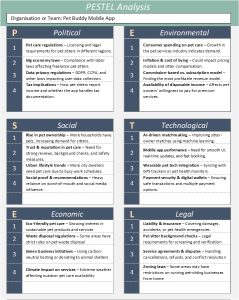
3. PESTEL Analysis

Similar to SWOT, the PESTEL (Political, Economic, Social, Technological, Environmental, and Legal) analysis helps project managers assess external risks. This analysis provides a broader view of potential risks that could affect a project, such as changes in laws, political instability, or technological advancements. For instance, if a new AI-driven technology emerges, it could represent both an opportunity and a risk for a mobile app project like Pet Buddy. Identifying these risks early on can allow teams to take advantage of opportunities while mitigating threats before they materialize.

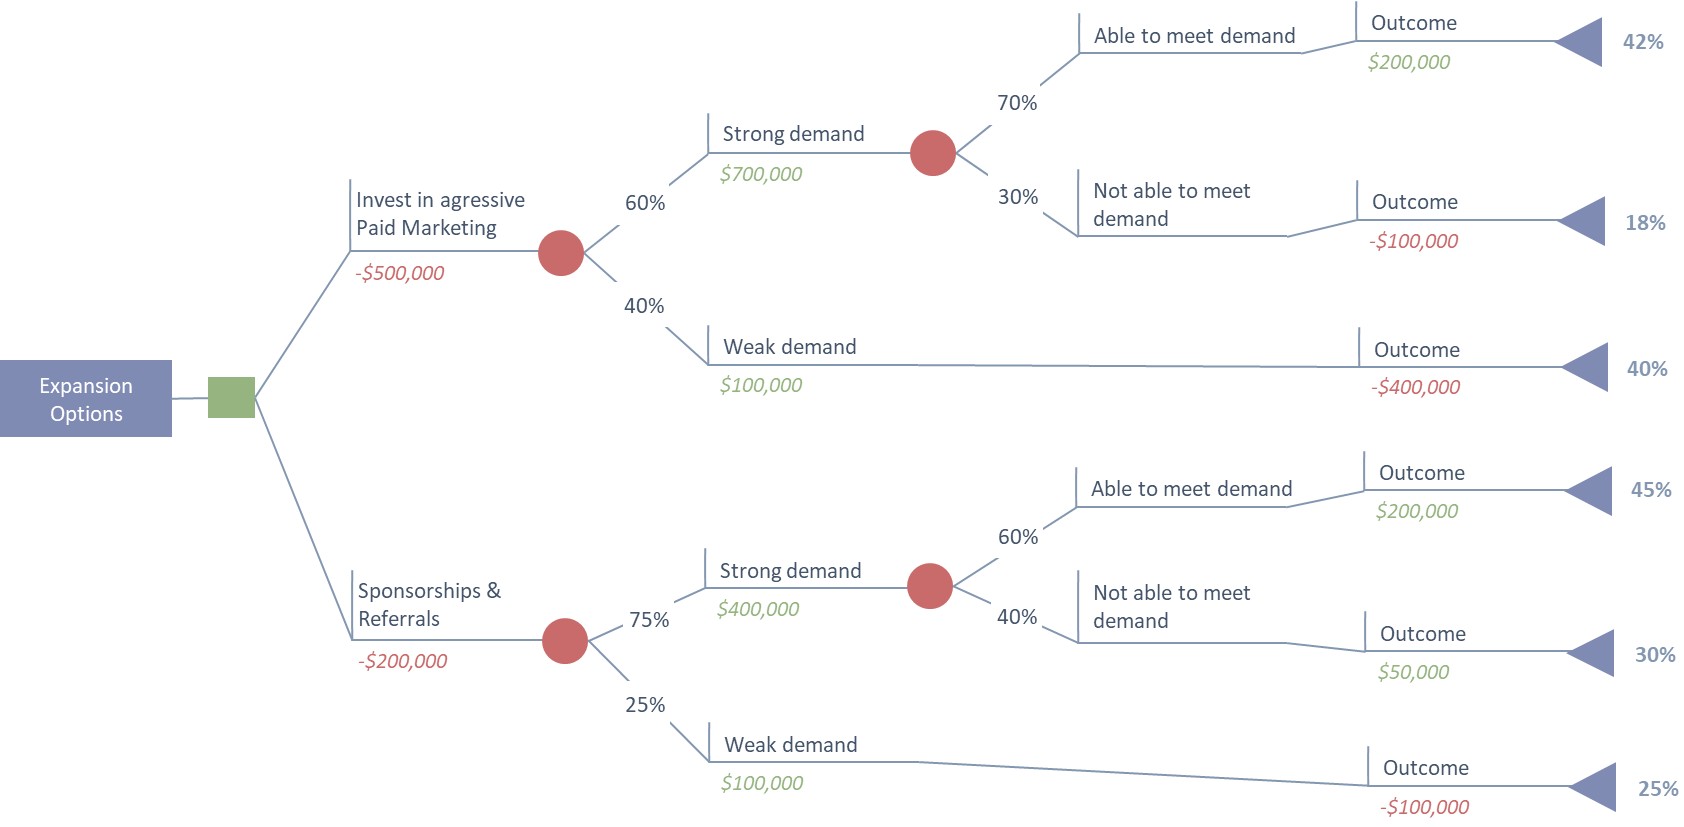
4. Decision Tree Analysis

Once risks are identified, it’s time to explore quantitative measures to understand the costs and benefits of various decisions. A decision tree analysis is a powerful tool for visualizing different decision paths, outcomes, and probabilities. By assessing various decision scenarios—such as choosing between two marketing strategies—project managers can determine the most cost-effective and impactful decision. For example, aggressive paid marketing may have a 60% chance of success, but a sponsorship approach might yield better returns with a higher probability. This tool helps project managers make data-driven decisions that optimize project outcomes while mitigating risks.

Decision Tree Analysis

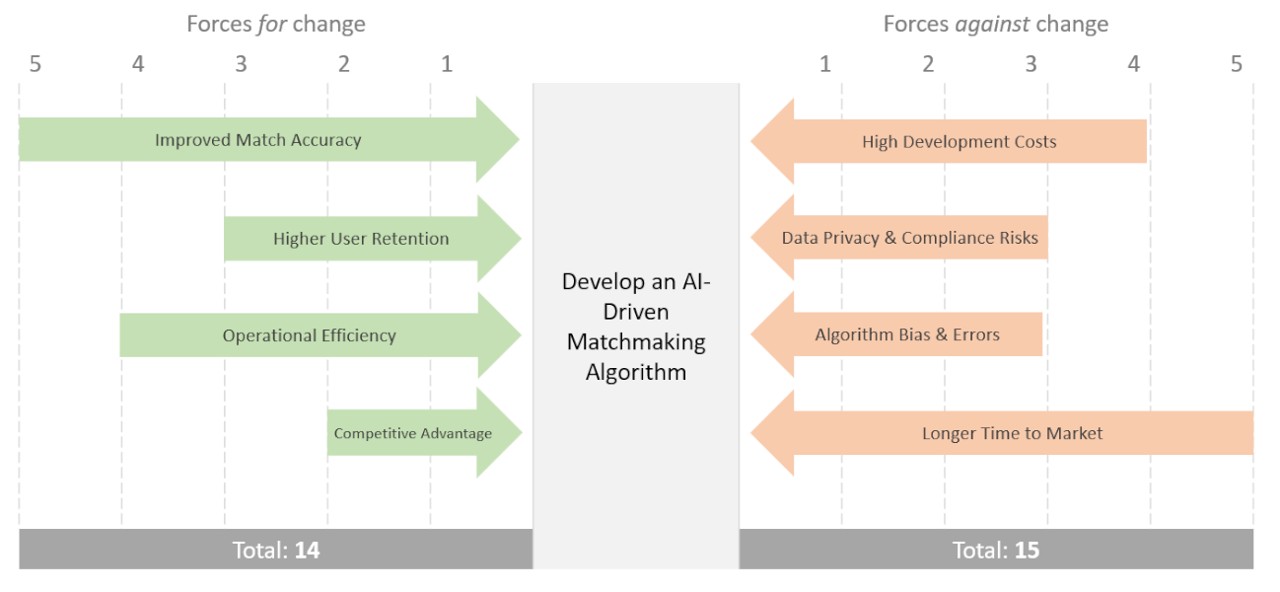
5. Force Field Analysis

Force Field Analysis is another technique used to assess the driving and restraining forces for a particular decision or change within a project. In risk management, it helps teams evaluate the pros and cons of a potential risk or opportunity. For example, when considering the development of an AI-driven matchmaking algorithm for the Pet Buddy app, the driving forces may include technological innovation and market demand, while the restraining forces might involve high development costs and potential algorithmic errors. By ranking these forces on a scale of 1 to 5, teams can assess whether the potential benefits outweigh the risks and make an informed decision.

Forcefield analysis

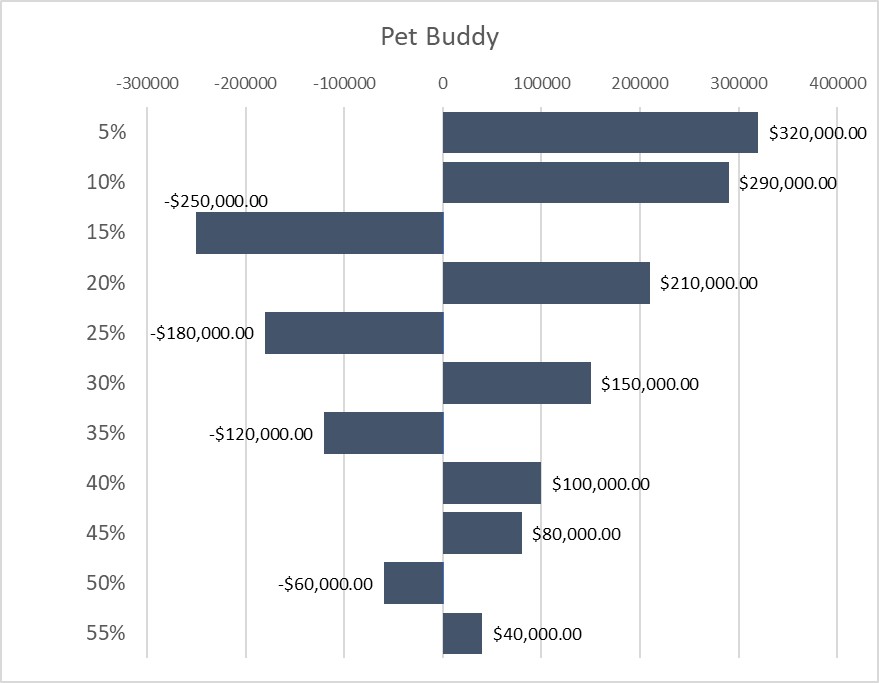
6. Sensitivity Analysis (Tornado Chart)

The Sensitivity Analysis, often depicted as a Tornado Chart, is used to evaluate how sensitive a project is to certain variables. For example, the Pet Buddy project could look at how changes in the commission rate for pet sitters affect overall revenue. By adjusting different variables (such as the percentage of commission), a project manager can visualize the positive and negative impacts on revenue. This analysis allows teams to identify which factors are most critical to the project’s success and prioritize actions that will minimize risks associated with those factors.

Tornado Chart - Sensitivity analysis

Conclusion

Risk management is a crucial part of project management, and these six tools—Risk Assessment Matrix, SWOT Analysis, PESTEL Analysis, Decision Tree Analysis, Force Field Analysis, and Sensitivity Analysis—help project managers stay ahead of potential issues. By leveraging these techniques, teams can identify risks early, quantify them, and implement controls to minimize their impact on the project. The Pet Buddy mobile app project is just one example where these tools can be applied to ensure success, but they are equally effective in various industries and project types. By incorporating these tools into your risk management plan, you can navigate the uncertainties of any project with confidence, ensuring a smoother path to success.

David McLachlan on LinkedIn

See more Project Tool articles: 

You can see what people are saying about David McLachlan here: REVIEWS

Navigate to Free Project Management and Leadership Articles through the links on the right (or at the bottom if on Mobile) 

PMI PMP 35 PDUs CourseThe Ultimate PMP Project Management Prep Course (35 PDUs)
Agile Certified Practitioner (PMI-ACP 21 PDUs)The Complete PMI-ACP Course: (28 PDUs) 
50 Project Management Templates Gantt Chart Risk Matrix and more Excel50+ Project Management Templates in Excel and PowerPoint (Gantt Chart, Risk Matrix and more!)
Project Management Plan TemplatesPre-made Project Management Plan Template: Save 100 HOURS!


4 Project Tools For Managing Your Team

Click the video above to view

Managing Resources Effectively in the Pet Buddy Project: Key Tools for Success

In the fast-paced world of project management, especially when working with a dynamic project like Pet Buddy, managing resources is crucial for success. The Pet Buddy project is a mobile app designed to match pet sitters with pet owners, much like the “Uber for pet stays” concept. Samantha, the business owner, initiated this project with a clear vision and business case, and now, it’s time to turn that vision into a reality by effectively managing the team and their roles. In this article, we will explore four essential tools to manage resources and ensure the project’s success: the RACI chart, Team Charter, Meeting Cadence Planner, and Retrospective.

1. RACI Chart: Clarifying Roles and Responsibilities

One of the first steps in managing resources is ensuring clarity around roles and responsibilities. The RACI chart (Responsible, Accountable, Consulted, Informed) is an essential tool in this regard. By creating a RACI chart, the project manager, Billy, can ensure that everyone on the team knows exactly what is expected of them.

For the Pet Buddy project, Billy works with the team to assign clear roles for every task. For example:

  • Responsible: Developers Max, Olivia, Liam, and Isa are responsible for the source code.
  • Accountable: Max, the senior developer, is accountable for overseeing the source code and ensuring it meets the required quality standards.
  • Consulted: Senior User, Ben, provides expert judgment on project deliverables.
  • Informed: The project sponsor, Samantha, is kept informed about progress through regular project status reports.

The RACI chart is an effective way to make sure that tasks are not duplicated or overlooked, providing the clarity needed for the team to move forward.

RACI Template

2. Team Charter: Defining the Mission and Values

Once everyone knows their roles, the next step is to create a Team Charter, a document that outlines the mission, values, ways of working, and team expectations. For the Pet Buddy project, the charter clarifies why the project exists (to create an app for connecting pet sitters and pet owners) and sets the team up for success by defining how they will work together.

The Team Charter covers:

  • Project background: The need for the mobile app that facilitates pet stays.
  • Team roles and stakeholders: Clear identification of project sponsors, managers, analysts, developers, testers, etc.
  • Ways of working: Values like punctuality, availability, and commitment to collaboration.
  • Communication plans: Setting expectations for how the team will stay connected, whether through in-person meetings or communication platforms like messaging software or video calls.
  • Decision processes: Who makes the final decisions on scope changes, work adjustments, and estimates?

Having a Team Charter helps create a shared understanding of expectations and improves team cohesion, ensuring that everyone is on the same page from day one.

Team Charter Template

3. Meeting Cadence Planner: Optimizing Collaboration

Meetings are an essential part of any project, but the key to successful collaboration is having the right number of meetings at the right times. Billy, the project manager, uses a Meeting Cadence Planner to ensure that the team meets as needed, but without overwhelming them with unnecessary discussions.

For the Pet Buddy project, the meeting cadence includes:

  • Daily stand-ups: A short daily check-in meeting where everyone shares what they worked on yesterday and what they plan to work on today.
  • User story elaboration sessions: Twice a week, the team comes together to clarify acceptance criteria and refine user stories.
  • Ad-hoc meetings: When necessary, the team gathers to resolve specific issues or make key decisions.

By using the Meeting Cadence Planner, Billy can keep the team focused on work while ensuring they have enough opportunities for collaboration, feedback, and decision-making.

Meeting Cadence Planner Template

4. Retrospective: Continuous Improvement

In any project, there’s always room for improvement. After every sprint or iteration (typically every two weeks), the team holds a Retrospective. This agile practice allows the team to reflect on what went well, what challenges arose, and what lessons can be learned.

The retrospective for the Pet Buddy project might cover:

  • What went well: Perhaps the team communicated effectively, or maybe the development was faster than expected.
  • Challenges: Maybe some items weren’t fully elaborated, leading to misunderstandings and delays.
  • Lessons learned: Initial task estimations could be more accurate in the future.
  • What still puzzles us: Any questions we need answered.

We should also have actions for improvement: Adjusting estimations, refining the scope definition, or improving communication.

This continuous feedback loop helps the team improve their processes and become more efficient over time, making them a high-performing group.

Retrospective Template

Conclusion

By implementing these four resource management tools – RACI, Team Charter, Meeting Cadence Planner, and Retrospective – the Pet Buddy project team can manage their time, resources, and relationships more effectively. These tools help the team stay aligned with their goals, communicate effectively, and continually improve their processes, ensuring the project’s success. Whether you’re working on a project like Pet Buddy or any other, these tools can set your team up for success, helping them deliver high-quality results.

David McLachlan on LinkedIn

See more Project Tool articles: 

You can see what people are saying about David McLachlan here: REVIEWS

Navigate to Free Project Management and Leadership Articles through the links on the right (or at the bottom if on Mobile) 

PMI PMP 35 PDUs CourseThe Ultimate PMP Project Management Prep Course (35 PDUs)
Agile Certified Practitioner (PMI-ACP 21 PDUs)The Complete PMI-ACP Course: (28 PDUs) 
50 Project Management Templates Gantt Chart Risk Matrix and more Excel50+ Project Management Templates in Excel and PowerPoint (Gantt Chart, Risk Matrix and more!)
Project Management Plan TemplatesPre-made Project Management Plan Template: Save 100 HOURS!


4 Must-Know Project Budget Tools

Click the video above to view

Essential Project Cost Management Tools for Success

Managing project costs effectively is one of the cornerstones of successful project delivery. In this article, we’ll explore four key project cost management tools that every project manager should master, as outlined in the PMBOK Guide. Using the Pet Buddy project – a mobile app connecting pet owners with pet sitters – we’ll walk through how these tools are applied to ensure the project stays on budget and is financially successful.

1. Work Breakdown Structure (WBS) Dictionary with Cost Attributes

The first step in managing project costs is to clearly define the scope and the costs associated with each work item, with our Cost Estimates. The Work Breakdown Structure (WBS) Dictionary serves as a detailed record of the project’s scope, including estimates of the cost for each individual work item.

Additionally, these cost estimates can be enhanced by using commercial databases – resources that provide industry-standard pricing data for various project needs. These databases help refine cost estimates, making them more accurate and grounded in real-world pricing trends.

WBS Dictionary template

2. Bottom-Up Estimating

Once we’ve outlined the scope and cost estimates, the next step might include adding up those costs to an overall budget with Bottom-Up Estimating. This process involves calculating the cost of each small work package or task, then aggregating these costs to get the total cost of the project.

In Pet Buddy, the project manager would begin by estimating the cost of each individual feature (e.g., user registration, payment processing, pet sitter profiles). Afterward, these smaller costs are summed up to determine the overall budget for the app. This approach ensures that no detail is overlooked, and all costs are accounted for, resulting in a comprehensive budget estimate that reflects the entire project’s scope.

Cost - Bottom Up Estimating template

3. Project Budget (Planned vs. Actual)

With a detailed project budget in place, it’s essential to track the actual spending against the planned budget to ensure financial control. The Project Budget tool allows project managers to compare how much was originally budgeted for each aspect of the project versus what has been spent at any given point.

For Pet Buddy, a budget tracking system would automatically highlight where spending has exceeded the budget (marked in red) or come under budget (marked in green). This comparison allows the team to take corrective actions if certain features are running over budget, ensuring the project remains financially on track.

A Budget Trend Chart can visually display this data, helping project managers track financial performance over time. By comparing the actual cost (green) to the planned value (orange), project managers can quickly see if the project is on target, ahead, or behind financially, allowing for timely decision-making and adjustments.

Cost budget template

4. Contingency and Management Reserves

Despite thorough planning and estimating, unforeseen issues can still arise, which is why Contingency Reserves and Management Reserves are crucial components of a project’s financial plan.

Contingency Reserves are funds set aside to deal with known risks or issues that are anticipated during the project. For instance, if there are potential delays in the app’s development due to vendor issues, a contingency reserve might be used to cover these additional costs. In the Pet Buddy project, the team has allocated $35,000 for such known risks.

Management Reserves, on the other hand, are intended for unforeseen changes to the project scope, such as adding new features or responding to changes in market conditions. Pet Buddy has set aside $80,000 for these types of unexpected changes.

It’s important to note that these reserves are not automatically spent but are accessed only when necessary and with approval from the appropriate stakeholders.

Cost Management and Contingency Reserves

5. Periodic Funding Requirements and Milestones

Managing cash flow is critical in any project, and Periodic Funding Requirements ensure that the project has the necessary funding at each phase. For Pet Buddy, this means releasing funds at different milestones based on project progress.

The funding structure starts with an initial release of $200,000 to kickstart the project. As the app development progresses and key deliverables are completed, subsequent funding releases are made, contingent on meeting certain milestones. If the project progresses as planned, funding will be released according to the schedule, supporting the continued work on the app. If not, there may be delays or cutoffs in funding, which is why consistent progress is crucial to ensure the project remains financially viable.

A Milestone Chart visually maps out the project’s funding requirements at each phase, from initial development through to completion. It ensures that the team has the necessary resources at every stage of the project, while also providing stakeholders with clear visibility into the project’s financial health.

Cost Management and Contingency Reserves 02

Cost Management and Contingency Reserves 03

Conclusion

Project cost management is an ongoing and essential part of project success, and the tools highlighted above—WBS Dictionary with Cost Attributes, Bottom-Up Estimating, Project Budget (Planned vs. Actual), Contingency and Management Reserves, and Periodic Funding Requirements – are the backbone of ensuring that costs are carefully planned, monitored, and controlled.

By applying these tools, Pet Buddy’s project team can effectively manage costs, adjust to financial changes, and make informed decisions throughout the project lifecycle. Whether you’re working on a tech development project like Pet Buddy or a large-scale construction effort, these project cost management tools will help ensure that your project remains on budget and successfully meets its financial goals.

David McLachlan on LinkedIn

See more Project Tool articles: 

You can see what people are saying about David McLachlan here: REVIEWS

Navigate to Free Project Management and Leadership Articles through the links on the right (or at the bottom if on Mobile) 

PMI PMP 35 PDUs CourseThe Ultimate PMP Project Management Prep Course (35 PDUs)
Agile Certified Practitioner (PMI-ACP 21 PDUs)The Complete PMI-ACP Course: (28 PDUs) 
50 Project Management Templates Gantt Chart Risk Matrix and more Excel50+ Project Management Templates in Excel and PowerPoint (Gantt Chart, Risk Matrix and more!)
Project Management Plan TemplatesPre-made Project Management Plan Template: Save 100 HOURS!


Get David McLachlan’s Udemy Courses for $14.99 During March 2025

If you’re on your PMP or ACP Journey this year – get my courses for $14.99 this March!

Coupon codes below – thousands of people are enjoying this course and using it to pass their PMP.

  • PMP Exam Prep (35 PDUs) – Use code: MAR2025PMP
  • Link: https://www.udemy.com/course/ultimate-project-management-pmp-35-pdus/?couponCode=MAR2025PMP


  • ACP Exam Prep (28 PDUs) – Use code: MAR2025ACP
  • Link: https://www.udemy.com/course/the-greatest-agile-course-ever-pmi-acp/?couponCode=MAR2025ACP

With consistent effort every day, you can pass your PMP. Keep growing, keep improving. You can do it!

Here’s what people are saying:

Master Project Schedules: 4 Essential Tools You Need to Know

Click the video above to view

4 Essential Project Scheduling Tools

If you want your project to stay on track, understanding and using the right scheduling tools is essential. In this article, we’ll break down four powerful project scheduling techniques that can help you plan, visualize, and manage your timeline effectively. Let’s dive in!

1. Schedule Network Diagram

A Schedule Network Diagram maps out the sequence of tasks in your project, showing the order in which activities need to be completed. For example, in our Pet Buddy project — an app that connects pet owners with sitters — we can list each feature and its estimated duration. By organizing tasks and estimating durations (e.g., 5 weeks for one feature, 3 weeks for another), we can identify the critical path — the sequence of tasks with zero slack. If any task on this path is delayed, the entire schedule shifts. This tool is invaluable for understanding task dependencies and pinpointing where delays might cause the biggest impact.

Schedule Network Diagram Template

2. Gantt Chart

Gantt charts are one of the most common ways to visualize project schedules. They lay out tasks along a timeline, showing start and end dates for each item. Whether you’re planning weekly or daily, a Gantt chart provides a clear view of when specific tasks will be delivered. It’s a straightforward and powerful way to communicate your schedule to stakeholders.

Gantt Chart Template

3. Sprint Burndown Chart

If you’re working in sprints, a Sprint Burndown Chart tracks how much work remains over time. Ideally, the chart trends steadily downward as tasks get completed. But if the line spikes up, it could indicate new tasks were added mid-sprint or some items took longer than estimated — as happened with the “dog sitter profiles” feature in our Pet Buddy example.

Sprint Burndown Chart Template

4. Kanban Board

For teams working in Agile or iterative environments, a Kanban board is a fantastic way to visualize work. Tasks move through stages like “In Development,” “Testing,” and “Done” as they progress. This tool is especially useful for sprint-based work, where teams complete batches of features in short cycles. Seeing tasks physically move through stages gives teams a real-time view of their progress.

Kanban Board Template

These tools – whether you use one or all – give your team visibility, control, and confidence. With a solid grasp of scheduling, you’ll keep your project on track and navigate changes like a pro. Happy scheduling!

David McLachlan on LinkedIn

See more Project Tool articles: 

You can see what people are saying about David McLachlan here: REVIEWS

Navigate to Free Project Management and Leadership Articles through the links on the right (or at the bottom if on Mobile) 

PMI PMP 35 PDUs CourseThe Ultimate PMP Project Management Prep Course (35 PDUs)
Agile Certified Practitioner (PMI-ACP 21 PDUs)The Complete PMI-ACP Course: (28 PDUs) 
50 Project Management Templates Gantt Chart Risk Matrix and more Excel50+ Project Management Templates in Excel and PowerPoint (Gantt Chart, Risk Matrix and more!)
Project Management Plan TemplatesPre-made Project Management Plan Template: Save 100 HOURS!


7 Ways To Prioritize Scope on Your Project

Click the video above to view

Mastering Scope Prioritization Tools for Your PMP Exam: The Pet Buddy App Example

If you’re preparing for the PMP exam, understanding scope prioritization tools is essential. In this article, we’ll walk through six critical tools from the PMBOK guide, using a real-world project example: the creation of the Pet Buddy mobile app. This app aims to be the “Uber for pet stays,” connecting pet owners with reliable pet sitters for both short-term and long-term care. Let’s dive into how the project team – led by Billy, with business owner Samantha – uses these tools to shape the app’s development.

1. Prioritization Matrix (Value/Effort)

A simple yet powerful tool, the prioritization matrix helps the team rank features by cost and benefit on a scale of 1 to 10. It could also rank them by Value over Effort. Features with high benefits and low costs are tackled first, while high-cost, low-benefit features move to the bottom of the list. For example, user profiles might score high in benefit and low in cost, making them a priority.

Prioritization Matrix Template

2. MoSCoW Method

MoSCoW stands for Must Have, Should Have, Could Have, and Won’t Have. The team sorts features into these categories to clarify priorities. Samantha works with stakeholders to decide that features like booking and scheduling are Must Haves, while dog-sitting add-ons might be Could Haves. To avoid endless must-haves (which happens in the real world), they can put a “work in progress” limit each for each category – five items for example.

MoSCoW Template

3. Trade-Off Sliders

The team uses trade-off sliders to decide what’s most fixed and most flexible on the project. For instance, they decide that meeting the project timeline is a must, while scope is flexible. This helps guide decisions when conflicts arise between features.

Project Trade-Off Sliders Template


4. Kano Analysis

Kano analysis categorizes features as Must-Have, Satisfying, or Delighting. It’s based on Customer Satisfaction, but over the feature’s lifecycle. Electric Windows in your car were “Delighters” in the 80s and 90s, but over time have become “Must Have” features – we won’t even consider a car if it has manual winding windows.

In Pet Buddy for example, payment processing is a Must-Have, while social features might start as Delighters but eventually become standard expectations over time. This helps the team decide when to introduce specific features.

Kano Analysis Template

5. Multi-Criteria Decision Chart

When facing complex decisions with multiple stakeholders, the team uses this chart to rank features across various criteria that they decide upon (e.g., customer satisfaction, ease of development, marketing value). This is extremely useful when there are complex competing needs and stakeholders.

By averaging scores of the criteria they choose, they identify the highest-priority features, like payment processing, while deprioritizing lower-scoring items.

Multi-Criteria Decision Matrix Template

6. Cost of Delay

The cost of delay method estimates the weekly profit lost if a feature is delayed. For example, if user profiles would bring in $6,500 per week and take 2 weeks to build, the cost of delay is $3,250 per week – we divide the expected profit by the time it takes to deliver.  Then we prioritize the highest to the lowest – the team uses this metric to prioritize high-value, fast-to-deliver features.

Cost of Delay Template

7. Multi-Voting

This simple yet powerful technique lets stakeholders vote on features using points, dots, or even Monopoly money. Each person distributes their votes across different features – they can spread votes evenly or place all of them on a single, high-priority item. The features with the most votes rise to the top of the list. It’s an effective, collaborative way to make collective decisions and balance competing priorities within the team.

Final Thoughts

By leveraging these tools, the Pet Buddy team systematically prioritizes features, balances stakeholder needs, and optimizes delivery. Whether you’re studying for your PMP exam or managing your own project, mastering these techniques will help you drive better outcomes and build products that truly meet user needs.

Want to dive deeper into these tools? Stay tuned for our next video, where we’ll apply them live in a project planning session!

David McLachlan on LinkedIn

See more Project Tool articles: 

You can see what people are saying about David McLachlan here: REVIEWS

Navigate to Free Project Management and Leadership Articles through the links on the right (or at the bottom if on Mobile) 

PMI PMP 35 PDUs CourseThe Ultimate PMP Project Management Prep Course (35 PDUs)
Agile Certified Practitioner (PMI-ACP 21 PDUs)The Complete PMI-ACP Course: (28 PDUs) 
50 Project Management Templates Gantt Chart Risk Matrix and more Excel50+ Project Management Templates in Excel and PowerPoint (Gantt Chart, Risk Matrix and more!)
Project Management Plan TemplatesPre-made Project Management Plan Template: Save 100 HOURS!


Pass Your Exam With These 3 Powerful Psychology Tricks

Click the video above to view

Unlock Your Exam Success: 3 Powerful Psychology Tricks (Plus 2 Bonus Tips!)

Have you ever wondered why some people seem to pass their exams effortlessly, even with minimal studying, while others struggle despite knowing all the material? The secret lies in psychology. Let’s dive into three powerful psychology tricks, inspired by Tony Robbins, to help you pass any exam. Plus, I’ll share two bonus tips that can make a huge difference in your success.

The 3 S’s for Exam Success

1. Strategy: Knowing What to Do

It may not seem like a psychology tip, but strategy is foundational. Whether you’re studying for an exam, losing weight, or pursuing a new job, the “what to do” is readily available. You can search online, take courses, and gather information. Having a clear plan influences your mindset and actions, setting the stage for success.

For your exam, I recommend taking Practice Exams – as many as possible – and reviewing where you went wrong. This way you will know when you are ready, or when you need to study more.

2. Story: The Narrative You Tell Yourself

What do you say to yourself when no one else is around?

Positive Story: “I’m great at taking tests. I stay calm, and time flies by.”

Negative Story: “I’m terrible at tests. I get nervous and always fail, even when I know the material.”

The story you believe becomes your reality, because your brain starts collecting evidence to support your narrative. A positive story boosts your confidence and encourages consistent effort, while a negative one sabotages your progress. Start telling yourself empowering stories and repeat affirmations like, “I’m capable of passing this exam.” Over time, your mindset will shift, and your actions will follow.

3. State: Your Energy and Emotional State

Your emotional state can make or break your performance. Are you pumped up and ready to conquer your exam? Or are you drained and doubting yourself?

One quick way to change your state is through physiology. Stand tall, smile, and even try a “power pose” for 30 seconds — this can boost confidence and energy. Your physical state directly influences your mental state, so use this to your advantage.

Bonus Tips for Exam Mastery

4. Massive Action Plan: Daily Habits and Practice

Success isn’t just about mindset — it requires action. Every student I’ve helped pass their exams developed a daily study habit. They took practice exams, measured their progress, and made studying a consistent routine. A structured plan, combined with the right psychology, creates unstoppable momentum.

5. Net Time (No Extra Time): Study Anytime, Anywhere

Struggling to find time? Use “Net Time” to study during moments that would otherwise go to waste. Listen to recordings during your commute, review flashcards on your lunch break, or watch videos while exercising. By doubling up activities, you reclaim valuable hours and stay on track.

You Can Do It

Combining these psychology tools with consistent action will transform your exam preparation. Remember, you are capable of success. I believe in you — now it’s time for you to believe in yourself.

Go crush that exam!

David McLachlan on LinkedIn

See more PMP articles: 

You can see what people are saying about David McLachlan here: REVIEWS

Navigate to Free Project Management and Leadership Articles through the links on the right (or at the bottom if on Mobile) 

PMI PMP 35 PDUs CourseThe Ultimate PMP Project Management Prep Course (35 PDUs)
Agile Certified Practitioner (PMI-ACP 21 PDUs)The Complete PMI-ACP Course: (28 PDUs) 
50 Project Management Templates Gantt Chart Risk Matrix and more Excel50+ Project Management Templates in Excel and PowerPoint (Gantt Chart, Risk Matrix and more!)
Project Management Plan TemplatesPre-made Project Management Plan Template: Save 100 HOURS!


14 Tools to Manage Scope on Your Project

Click the video above to view

14 Essential Scope Management Tools for PMP Exam and Real-World Application

In project management, particularly in the PMP exam and real-world scenarios, scope management tools play a critical role in ensuring that a project meets its objectives. We’re going to go through 14 essential scope management tools that will not only help you with your PMP exam but also provide invaluable support when managing scope and requirements in your projects. We’ll explore these tools in the context of a fictional project, “Pet Buddy,” a mobile app designed for a pet daycare business.

1. Swimlane Flowchart

The swim-lane flowchart is a simple yet powerful tool for visualizing a customer’s journey in a process. It divides the process into “swimlanes,” representing different departments, systems, or stages involved in the process. For example, in the Pet Buddy app project, you can visualize how a customer progresses from downloading the app to booking a pet sitter, interacting with the business at various points.

This is perfect for getting an idea of the current customer experience, or seeing the experience we want to design.

2. Simple Process Flowchart

This tool is a more straightforward flowchart, depicting processes from left to right, or from top to bottom. It simplifies the visualization of customer decisions and actions, highlighting process steps and decision points (usually represented by diamonds).

3. Value Stream Map

A value stream map helps track the flow of customer orders from start to finish while focusing on value-added and non-value-added time. By highlighting unnecessary delays or inefficiencies, it enables teams to streamline processes, adding more value to the customer while reducing waste. There are dozens of icons in a VSM, from supermarkets, queues, push and pull, messaging, databases, Kanban signals and more.

4. Customer Journey Map

Customer journey mapping outlines the specific steps customers take, alongside their emotional journey or how they rate each step for their satisfaction. For the Pet Buddy app, this could involve stages like downloading the app, setting up a profile, and booking a sitter. Mapping these touchpoints helps identify pain points and improve user experience.

It also includes our typical customer “persona” and what they typically want.

Customer Journey Map

5. SIPOC (Supplier, Input, Process, Output, Customer)

SIPOC is a tool used to map out processes, emphasizing the suppliers, inputs, processes, outputs, and customers. In the case of Pet Buddy, this tool would help clarify the sequence of steps needed to book a pet sitter, who the suppliers are for that process step (e.g., customer databases or payment systems), and who the customers are (e.g., pet owners or sitters, or whoever gets the benefit of that process step).

SIPOC Template

6. UML Sequence Diagram

A UML sequence diagram models how information flows through a system, across its different code classes or connecting systems. It’s particularly helpful for visualizing the interactions between users and the systems involved. For Pet Buddy, this could show how customer data flows through various subsystems like payment processing, notifications, and booking.

This is a great architecture diagram to figure out what the current system looks like, or what we want it to look like in the final product.

UML Sequence Diagram

7. Context Diagram

A context diagram provides a bird’s-eye view of how the systems within a project interact with each other – with simple Circle as the main system, and boxes surrounding it to show what information flows where.

This is a great tool for understanding the architecture of the Pet Buddy app, depicting how the mobile app connects with other systems such as payment gateways and customer databases.

Context Diagram template

8. Brainstorming & Grouping

Brainstorming with our team helps generate ideas, which are then grouped into categories based on their similarities. This allows teams to prioritize their thoughts and ideas effectively, especially for meeting the customer requirements with our project scope.

For Pet Buddy, brainstorming might lead to ideas for new features, which can then be grouped by functionality (e.g., user profile management, payment processing).

Brainstorming template

9. Affinity Diagram

The affinity diagram is an extension of brainstorming, grouping ideas that are related in a visual manner – with an “affinity” to each other. This tool is helpful when organizing and categorizing ideas, making it easier to see patterns and prioritize tasks that will best meet customer requirements.

Affinity Diagram template

10. Nominal Group Technique

The nominal group technique is a structured method for brainstorming that encourages anonymous idea generation. The team write their ideas then they are revealed together, ensuring the highest paid person or the loudest person in the room doesn’t influence their ideas.

This ensures that all team members have an equal say, and it can help prioritize features, with team members anonymously voting on which ideas are most critical for the success of the Pet Buddy app.

Nominal Group Technique template

11. Mind Map

A mind map is a visual representation of ideas, with the central concept at the core and branching out into related topics in smaller and smaller pieces – decomposing similarly to a Work Breakdown Structure.

For scope management, it’s a great way to break down complex topics and see the bigger picture. For Pet Buddy, a mind map might break down the app’s features like matchmaking, booking, and payment processing into smaller Work Packages and even activities.

Mind Map template

12. Requirements Traceability Matrix

The requirements traceability matrix is an essential tool for ensuring that project scope aligns with original customer requirements. It tracks the relationship between requirements, features, and user stories, and quality test cases ensuring that every need is met in the final product.

Requirements Traceability Matrix Template

13. Work Breakdown Structure (WBS)

The WBS is a hierarchical structure that breaks down the project scope into smaller, manageable components. For Pet Buddy, this might include categories such as user profiles, booking features, and payment integration, and smaller work packages or activities.

The WBS enables a clearer breakdown of the project scope, so we can schedule and assign it better.

Work Breakdown Structure template

14. WBS Dictionary

The WBS dictionary provides detailed information about each item in the WBS, including descriptions, durations, costs, and quality acceptance criteria. It’s an indispensable reference for ensuring that everyone on the team is aligned with the project scope and expectations.

It becomes the central database of project information when it is used and updated properly.

WBS Dictionary template

Conclusion

Using these 14 scope management tools in your PMP preparation and real-world projects will help you successfully manage scope, streamline processes, and meet customer expectations. Tools like flowcharts, SIPOC, value stream maps, and the requirements traceability matrix ensure that your project stays on track and aligns with business objectives. Properly applying these tools will give you a competitive advantage in your PMP exam and in delivering successful projects in your professional career.

David McLachlan on LinkedIn

See more PMP articles: 

You can see what people are saying about David McLachlan here: REVIEWS

Navigate to Free Project Management and Leadership Articles through the links on the right (or at the bottom if on Mobile) 

PMI PMP 35 PDUs CourseThe Ultimate PMP Project Management Prep Course (35 PDUs)
Agile Certified Practitioner (PMI-ACP 21 PDUs)The Complete PMI-ACP Course: (28 PDUs) 
50 Project Management Templates Gantt Chart Risk Matrix and more Excel50+ Project Management Templates in Excel and PowerPoint (Gantt Chart, Risk Matrix and more!)
Project Management Plan TemplatesPre-made Project Management Plan Template: Save 100 HOURS!


6 Essential Tools To Manage Your Project Stakeholders

Click the video above to view

Managing stakeholders
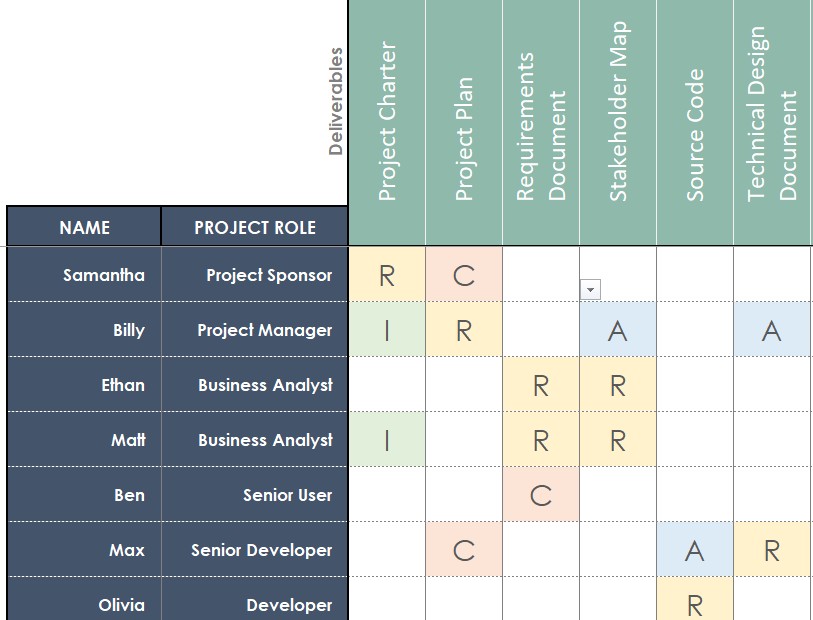
Mastering Stakeholder Management: 6 Essential Tools for Your Project

Here are 6 tools that will not only help you with real-world projects but also give you a strategic edge when answering PMP exam questions.

For this discussion, we’re looking at a project called “Pet Buddy”, a mobile app aimed at making pet care more accessible, and we’ll look at how these stakeholder management tools work within this project.

1. Organizational Breakdown Structure (OBS)

The first tool we’re looking at is the Organizational Breakdown Structure (OBS), also sometimes referred to as an organizational chart. This is an incredibly helpful tool when you’re trying to identify stakeholders within the business. For Pet Buddy, the project sponsor is Samantha, the business owner, and at the top of the structure, she leads the project.

The OBS helps us understand the hierarchy and responsibilities within the organization so we can identify the right stakeholders who will be impacted by or have influence over the project. As you start a project, it’s crucial to look at the organizational structure to ensure you’re engaging the right people.

Organizational Breakdown Structure Template

2. Resource Breakdown Structure (RBS)

Once we’ve pinpointed our key stakeholders, we move on to forming our project team. Here, we use the Resource Breakdown Structure (RBS), which is essentially an outline of all the resources needed for the project – whether human or material. In this case, it’s our team, and we can break down the specific roles within the project team and clarify their responsibilities.

For the Pet Buddy project, we have our project sponsor, Samantha, along with our project manager (Billy), business analysts, developers, and testers. By organizing our resources clearly through the RBS, we ensure that everyone knows their role, responsibilities, and contributions. This structured approach makes it easier to identify any gaps in resources as the project progresses.

Resource Breakdown Structure Template

3. Stakeholder Register

After identifying stakeholders and forming our team, it’s time to capture all these details in the Stakeholder Register. The register includes each stakeholder’s name, role, and responsibility, and can also include their influence and impact on the project.

Take Samantha, for example – she is the project sponsor, and her role is critical, as she provides funding and resources and helps resolve escalated issues. Similarly, we’ll record the responsibilities of other stakeholders like those in Business Analysis, Testing, and Subject Matter Experts in operations and marketing or other business departments. In the register, we can also rate their level of influence and impact, usually on a scale from 1 to 10, to understand how much their involvement will affect the project.

Stakeholder Register Template

4. Stakeholder Classification Matrix

Next we can use a Stakeholder Classification Matrix (also called a Stakeholder Map), which helps us categorize stakeholders based on any two critical factors: often their influence on the project and the impact the project is having on them.

For example, Samantha has both high influence and is also highly impacted by the project – she controls the resources and funding, and any changes will directly affect her. Conversely, someone in a front-line role, such as a customer service representative, may have high impact (the app affects their day-to-day work) but low influence on the project’s direction. The goal is to classify each stakeholder so that we can engage with them appropriately – collaborating closely with those who have high influence, keeping informed those who are impacted but have less influence, and monitoring those with lower levels of both.

Stakeholder Classification Matrix Template

5. Salience Chart

Another tool you can use is the Salience Chart. This chart categorizes stakeholders based on three key factors: power, legitimacy, and urgency. Stakeholders who have all three -power to influence the project, a legitimate role, and urgent needs – are those you need to engage with the most.

The Salience Chart helps you prioritize which stakeholders require your attention at any given time. For instance, if a stakeholder has high power but low urgency or legitimacy, the information and frequency of the communication you give them may change. On the other hand, if they have all three factors, they are a “definitive” stakeholder, and you must engage with them actively. This chart is a great way to visualize stakeholder engagement and ensure you’re addressing the most critical ones first.

Salience Chart

6. Stakeholder Engagement Matrix

Finally, we look at the Stakeholder Engagement Matrix, which helps assess how engaged your stakeholders are and how engaged they should be. This matrix compares the current state of stakeholder engagement with the desired state.

The options are Unaware, Resistance, Neutral, Supportive and Leading, and we rate them for their “Current” engagement, versus where we want them to be – their “Desired” engagement.

For example, if Sophie from marketing is currently unaware of the project but is crucial for launching the app, we need to move her from “unaware” to “leading.” Similarly, if Lucas from operations is neutral but we need him to be supportive, we’ll need to increase communication and collaboration with him to get him on board. The matrix ensures that you’re not only aware of the stakeholder’s current involvement but also actively working to move them toward the desired level of engagement.

Stakeholder Engagement Matrix Template

Wrapping Up

These six stakeholder management tools are all essential for your PMP exam and for managing projects successfully in the real world. They help you ensure that you’re engaging the right people, understanding their influence and impact, and actively managing their involvement throughout the project lifecycle.

As you prepare for your PMP exam, remember that mastering these tools can make a significant difference in your project’s success. And if you’re actively working on projects like Pet Buddy, these tools are directly applicable, providing a clear structure for managing stakeholders effectively.

If you’re studying for your PMP exam, keep working hard, stay consistent, and remember that mastering these tools will pay off in both your exams and your future projects.

Keep up the great work!

David McLachlan on LinkedIn

See more PMP articles: 

You can see what people are saying about David McLachlan here: REVIEWS

Navigate to Free Project Management and Leadership Articles through the links on the right (or at the bottom if on Mobile) 

PMI PMP 35 PDUs CourseThe Ultimate PMP Project Management Prep Course (35 PDUs)
Agile Certified Practitioner (PMI-ACP 21 PDUs)The Complete PMI-ACP Course: (28 PDUs) 
50 Project Management Templates Gantt Chart Risk Matrix and more Excel50+ Project Management Templates in Excel and PowerPoint (Gantt Chart, Risk Matrix and more!)
Project Management Plan TemplatesPre-made Project Management Plan Template: Save 100 HOURS!


Want to Pass your PMP? Don’t Do These 6 Things

Click the video above to view

managing a project6 Things to Avoid When Answering PMP Exam Questions

The PMP exam is known for its challenging scenario-based questions, which test your ability to apply project management principles effectively. Recently a successful student passed the PMP exam using the “PMP Fast Track” method, and distilled this into six key things to avoid, which helped him zero in on the right answers more quickly. Here are the six things to consider when approaching the PMP exam:

1. Don’t Hire If You Can Help It

In some situations, adding new team members may seem like the right solution, especially when there’s a problem with team capacity. However, correct answers often focus on using the resources you already have. The goal is not to immediately hire additional people, but rather to think about how you can solve the issue by optimizing existing resources. While hiring may sometimes be the answer, it’s not the first thing to consider. Look for ways to resolve the issue with the team or resources currently available.

2. Avoid Firing Team Members Too Quickly

When problems arise, firing a team member might seem like a quick fix, but it’s important to remember that a core aspect of project management is team development. Instead of thinking about firing, focus on the possibility of coaching, upskilling, or providing additional training to the team member involved. In most cases, performance issues can be addressed through support and improvement, rather than through drastic actions like firing. While firing might be necessary in some extreme cases, it’s not something to jump to immediately.

3. Don’t Ask for Extra Money

One of the most common impulses when faced with project challenges is to request more funds, especially if there are budget constraints or delays. However, the PMP exam tends to emphasize problem-solving within the existing project parameters. Rather than asking for more money right away, look for ways to address the problem through better management of resources, time, or scope. There may be times when additional funding is unavoidable, but it’s typically more effective to first explore alternative solutions like adjusting timelines, fast-tracking, or reallocating resources.

4. Do Your Job Before Escalating

While it’s natural to want to escalate an issue or ask for help when a project faces challenges, the PMP exam tests your ability to manage the situation as the Project Manager, when possible. In many cases, you should first try to solve the issue within your own team before asking for help. That doesn’t mean you should never escalate – it just means that you should prioritize looking for solutions with the team and resources at your disposal. If escalation is necessary, make sure it’s for the right reasons, such as when the issue is truly beyond your control.

5. Don’t Do Nothing—Take Action

In any project, doing nothing is often the worst option. The exam tests your ability to take appropriate action when problems arise. While some situations might require a more thoughtful approach or time for reflection, in most cases, doing nothing is not the answer. Look for ways to address the problem proactively, whether it’s through problem-solving, working with your team, or adjusting your approach.

6. Avoid Shifting Responsibilities

A key part of project management is ensuring everyone knows their roles and responsibilities. While it’s important to delegate tasks, the PMP exam emphasizes that you should not attempt to offload your responsibilities onto others. However, there are times when you may need to rely on your team for their expertise, and ensure others do their job – the issue lies in ensuring that everyone fulfills their duties as assigned. If you encounter a challenge, it’s your responsibility to manage the situation, rather than trying to shift your own responsibilities onto others.

A Thoughtful Adjustment

Focus on seeking expertise from your team when appropriate. The collective knowledge of your team is a powerful resource, and collaborating with them for problem-solving is often the best way to move forward. While escalation or asking for outside help might sometimes be necessary, start by tapping into your team’s expertise to find a solution.

Always remember, you can do it. The PMP is a wonderful thing to achieve, and with dedication and practice, you can achieve it.

David McLachlan on LinkedIn

See more PMP articles: 

You can see what people are saying about David McLachlan here: REVIEWS

Navigate to Free Project Management and Leadership Articles through the links on the right (or at the bottom if on Mobile) 

PMI PMP 35 PDUs CourseThe Ultimate PMP Project Management Prep Course (35 PDUs)
Agile Certified Practitioner (PMI-ACP 21 PDUs)The Complete PMI-ACP Course: (28 PDUs) 
50 Project Management Templates Gantt Chart Risk Matrix and more Excel50+ Project Management Templates in Excel and PowerPoint (Gantt Chart, Risk Matrix and more!)
Project Management Plan TemplatesPre-made Project Management Plan Template: Save 100 HOURS!